Red Brick Patio: Classic and Timeless Outdoor Design

Source : https://st.hzcdn.com

When it comes to creating a functional and aesthetically pleasing outdoor space, few materials rival the beauty and charm of a red brick patio. Known for its classic appeal, red brick has stood the test of time and remains a popular choice for homeowners seeking to add character and sophistication to their backyard. Whether you’re building a small intimate space for relaxation or a large entertaining area, a red brick patio offers a durable and timeless foundation that can complement any style. In this article, we’ll explore the benefits, design options, and maintenance considerations for creating a red brick patio, making it a versatile choice for any outdoor setting.

1. The Timeless Appeal of Red Brick Patios

The Classic Look of Red Brick

Red brick patios have long been a symbol of tradition and elegance in outdoor design. This material’s natural warmth and rich color make it an ideal choice for creating inviting, classic outdoor spaces. The earthy tones of red brick work well with various landscaping elements, from vibrant plants to rustic furniture, and they provide a strong contrast to the greenery in your garden.

What sets red brick patios apart is their timelessness. Unlike trendy materials that may fade in popularity over time, red brick has remained a staple in both traditional and modern outdoor design. It’s a material that not only looks beautiful but also improves with age, developing a weathered, patina-like finish that adds to its charm. The durability of red brick also ensures that your patio will last for many years, enduring changing weather conditions without losing its aesthetic appeal.

Red brick is also incredibly versatile in design. Whether you prefer a geometric pattern, herringbone design, or a more casual arrangement, the simplicity and natural color of the bricks allow for a variety of creative expressions. This adaptability ensures that a red brick patio will fit seamlessly into any outdoor space, whether it’s part of a rustic country garden or a sophisticated urban retreat.

Versatility for Any Outdoor Space

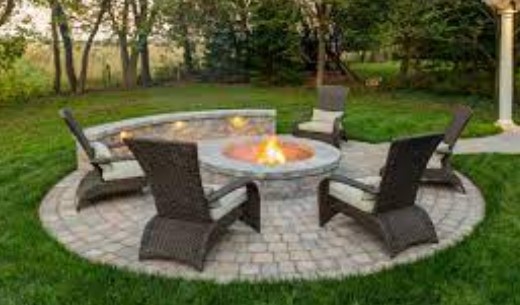
A red brick patio can be designed to fit a variety of spaces and styles. For a smaller, intimate setting, you can create a cozy, circular patio that encourages conversation and relaxation. On the other hand, larger patios offer the opportunity for multi-functional areas, such as dining spaces, fire pits, or even an outdoor kitchen.

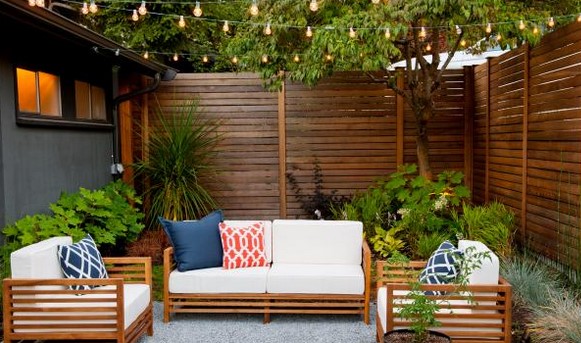
One of the key advantages of red brick is that it can work with different types of outdoor furniture and décor. For example, if your style leans toward rustic or cottage-inspired designs, you can pair a red brick patio with wicker furniture, cozy throw blankets, and potted plants. Alternatively, if you prefer a more contemporary approach, sleek metal furniture and minimalist planters can complement the warm hues of the brick.

2. How to Design a Red Brick Patio

Plan Your Layout and Space

Before embarking on your red brick patio project, it’s essential to carefully plan your layout and the size of the patio. Start by considering how you intend to use the space. Do you want it to be a quiet retreat for reading and enjoying nature, or will it serve as a place for entertaining guests? The purpose of the patio will help determine its shape, size, and placement.

A rectangular patio can provide plenty of room for outdoor dining or socializing, while a round or curved design can create a more intimate and relaxed atmosphere. Once you have a general idea of your space, it’s important to consider any surrounding landscaping elements, such as plants, trees, or structures like pergolas. These features should complement the patio design and provide balance.

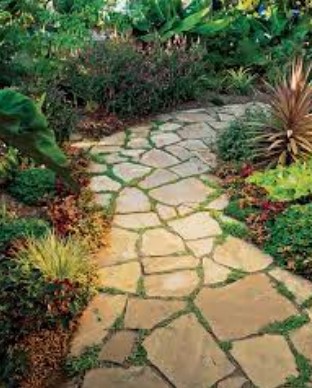
For homeowners working with smaller spaces, it’s important to think about how the patio will flow with the rest of the outdoor area. A red brick patio can seamlessly blend into existing walkways or gardens, offering a sense of continuity while creating distinct outdoor zones. Additionally, consider incorporating greenery around the patio, as the vibrant colors of plants like ivy or flowering shrubs will complement the rich tones of the red bricks.

Pattern and Texture Choices

One of the benefits of using red brick for your patio is the variety of patterns and textures that can be incorporated. The most common brick patterns include:

  • Running Bond: A simple and classic pattern where each brick is laid end-to-end, with each row offset from the one beneath it. This pattern works well in both traditional and modern designs.
  • Herringbone: A distinctive “V” shaped pattern that gives the patio an elegant and dynamic feel. Herringbone is ideal for larger spaces and adds visual interest.
  • Basketweave: A grid-like pattern where pairs of bricks are placed in a woven design. This pattern is perfect for creating a traditional, old-world charm.

In addition to the layout pattern, red brick patios can feature different textures, such as smooth or rough finishes. For a more rustic, natural look, you can opt for tumbled or reclaimed bricks that have an aged appearance. This distressed look can add character to your patio and help it blend seamlessly with the surrounding environment.

3. Maintaining Your Red Brick Patio

Cleaning and Upkeep

Maintaining a red brick patio is relatively easy, as long as you stay on top of cleaning and care. Regular cleaning is essential to keep the bricks looking fresh and to prevent dirt or moss buildup. You can use a broom or a pressure washer to remove debris, but be cautious with pressure washing, as excessive force can damage the surface of the bricks. For routine cleaning, a mixture of water and mild soap will work wonders.

If you notice stubborn stains on your patio, you can use a mixture of vinegar and water to gently scrub away the marks. For more persistent stains, a specialized brick cleaner may be required. Additionally, it’s a good idea to periodically reseal your red brick patio to protect it from the elements and prevent water infiltration that could cause the bricks to crack or become discolored.

Weed Control and Repairs

Weeds can sometimes grow in between the bricks, which can detract from the appearance of your red brick patio. To control weeds, apply a weed barrier fabric underneath the patio during installation, or use a weed-killing solution regularly. If you notice any cracks or loose bricks, it’s essential to repair them as soon as possible. Fixing minor issues promptly will prevent them from becoming larger problems that may require a complete overhaul.

Preventing Moss and Algae Growth

Since red brick patios are often exposed to outdoor elements, they may develop moss or algae over time, particularly in shaded areas. While this natural growth can lend a certain rustic charm to your patio, it’s important to control excessive moss and algae to avoid slipping hazards. Use a mixture of bleach and water to gently scrub affected areas, and be sure to keep the surface dry whenever possible.

A red brick patio is a timeless and classic addition to any outdoor space, offering both beauty and functionality. Whether you’re designing a space for relaxation or entertainment, the versatility of red brick allows you to create a patio that complements your home’s style while providing a durable foundation for years of enjoyment. With proper care and maintenance, your red brick patio will remain a charming and elegant focal point, adding both value and character to your property for generations to come. A red brick patio is more than just an outdoor feature—it’s an investment in creating a beautiful, lasting space to enjoy the outdoors.

Building a Covered Patio: A Comprehensive Guide

Source : https://txdroofing.com

A covered patio can elevate your outdoor living space, providing a comfortable, sheltered area where you can relax, entertain, or dine throughout the year. Whether you want to escape the sun during hot summer days or enjoy your outdoor space even when it’s raining, building a covered patio is a practical and stylish way to extend your home’s functionality. This guide will walk you through the essential steps involved in building a covered patio, from planning and design to construction and finishing touches, so you can create the perfect outdoor retreat for your home.

Why Build a Covered Patio?

Before you dive into the project of building a covered patio, it’s important to understand the benefits of adding this structure to your outdoor space. A covered patio not only enhances your home’s aesthetic appeal but also offers a range of functional advantages that can improve your lifestyle. Here are some key reasons why you should consider adding a covered patio:

1. Protection from the Elements

A covered patio provides shelter from the sun, rain, and even light snow, allowing you to enjoy your outdoor space no matter the weather. This is particularly beneficial in regions with extreme temperatures or unpredictable weather patterns. By protecting your patio furniture and accessories from the elements, you can extend their lifespan and reduce maintenance.

2. Increased Home Value

Adding a well-designed, functional covered patio can increase your home’s value by enhancing its curb appeal and offering additional usable square footage. Potential homebuyers are often attracted to properties with appealing outdoor living spaces, which can make your home stand out in a competitive real estate market.

3. Entertainment and Relaxation Space

A covered patio creates an ideal space for socializing, dining, or relaxing with family and friends. It becomes a perfect venue for outdoor barbecues, parties, or even quiet evenings. With the right design, your covered patio can be a year-round space for enjoying the outdoors, rain or shine.

4. Energy Efficiency

A covered patio can also help improve the energy efficiency of your home by providing shade to windows and cooling down the surrounding environment. By keeping the direct sunlight from hitting your house’s walls, it can reduce heat buildup and keep your interior cooler, which may help lower your energy bills during the summer months.

Planning and Design Considerations

Building a covered patio requires careful planning and design to ensure that the structure complements your home and meets your needs. There are several important factors to consider before you begin construction:

1. Location and Size

The first step in planning your covered patio is determining the best location for it. The location should be easily accessible from the house, whether that’s near a door leading out to the backyard or next to your kitchen for outdoor dining. Additionally, consider how the patio will function. Do you want a small, intimate space for relaxation, or a larger area for entertaining?

The size of the patio will depend on how much space you have available and the intended purpose of the patio. It’s also important to consider factors like the placement of trees, landscaping, and other outdoor structures that might impact the overall size and shape of your patio.

2. Style and Design

Next, decide on the style and design of your covered patio. There are several options to choose from, depending on your aesthetic preferences and the architecture of your home:

  • Freestanding vs. Attached: A freestanding covered patio is a separate structure from the house, while an attached patio is built onto the existing structure of your home. Attached patios tend to be easier to construct and integrate well with the home’s design.
  • Roof Style: The roof of your covered patio can be flat, gabled, or even arched, depending on the look you want to achieve. Each roof style has different benefits in terms of aesthetics and functionality, so choose the one that best fits your home and needs.
  • Materials: The materials used for the patio cover are a crucial element of the design. Common materials for covered patios include wood, metal, vinyl, and fabric. Wood creates a natural, rustic feel, while metal offers a modern, industrial aesthetic. The material you choose will affect both the durability and maintenance requirements of your patio.

3. Budget and Permits

Establish a realistic budget for building your covered patio. Costs can vary greatly depending on the size, materials, and design complexity. Be sure to account for all aspects of the project, including labor, materials, permits, and any potential surprises that may arise during construction.

In many areas, building a covered patio requires permits from the local government. Before beginning construction, check with your local building department to ensure you meet all zoning requirements and code regulations. They will provide you with specific guidelines for the structure’s height, size, and placement, as well as the materials used.

Step-by-Step Guide to Building a Covered Patio

Now that you have a design plan and all the necessary materials, it’s time to begin building a covered patio. The process involves several key steps, including preparing the foundation, constructing the frame, installing the roofing system, and adding finishing touches. Here’s a general overview of the process:

Step 1: Prepare the Site

Before you start building, you’ll need to prepare the site for construction. This involves clearing the area of debris, leveling the ground, and marking the location of the patio. If you plan to install a concrete or stone foundation, now is the time to pour the base. Be sure to take accurate measurements to ensure the patio is aligned properly.

Step 2: Build the Frame

Once the foundation is prepared, it’s time to build the frame for the patio cover. This step involves constructing the support beams and posts that will hold up the roof. Depending on your design, you may need to anchor the posts to the ground or secure them to the house’s exterior. Use high-quality materials to ensure the frame is strong and stable.

Step 3: Install the Roof

After the frame is in place, install the roofing material of your choice. If you’re using shingles or metal panels, be sure to overlap them properly to prevent leaks. If you’ve chosen a fabric canopy or pergola-style roof, you’ll need to attach the fabric securely to the frame.

Step 4: Add Finishing Touches

With the basic structure complete, add finishing touches such as lighting, ceiling fans, and outdoor furniture. You may also want to incorporate landscaping elements like potted plants, outdoor rugs, and decorative accessories to create a cozy, inviting atmosphere.

Building a covered patio is an excellent way to enhance your home’s outdoor living space, offering protection from the elements and creating an area for relaxation and entertainment. By carefully planning your design, selecting the right materials, and following the proper construction steps, you can create a functional and stylish patio that adds value to your home. Whether you’re looking for a simple shelter or an elaborate outdoor oasis, building a covered patio can transform your backyard into a comfortable and attractive space to enjoy year-round. With the right approach and a bit of effort, you can build a patio that will serve as the heart of your outdoor gatherings for years to come.

Outdoor Culinary Retreat: Create Your Own Outdoor Cooking Area

Source : https://www.outeriors.com

Welcome to Outdoor Culinary Retreat: Create Your Own Outdoor Cooking Area! This is the perfect place to learn how to create a unique outdoor cooking area that will be the envy of your friends and family. Whether you are a beginner or an experienced outdoor chef, this retreat will provide you with the tools and knowledge to create a beautiful and functional outdoor cooking area. From selecting the right equipment to creating a unique design, you will learn how to create a space that is both inviting and practical. With the help of our experienced instructors, you will be able to create a space that is perfect for entertaining and cooking. So come join us and create your own outdoor cooking area!

How to Design an Outdoor Cooking Area for Maximum Efficiency and Enjoyment

Designing an outdoor cooking area for maximum efficiency and enjoyment requires careful consideration of the space, materials, and equipment. To ensure the best possible experience, the following steps should be taken.

First, consider the size and shape of the outdoor cooking area. The size of the space should be determined by the number of people who will be using it and the type of cooking that will be done. For example, a larger space may be needed for a large family gathering or for a more complex cooking process. Additionally, the shape of the space should be taken into account. A rectangular or square shape is often the most efficient, as it allows for easy access to all areas of the cooking area.

Second, select the materials for the outdoor cooking area. Durable materials such as stone, brick, or concrete are ideal for outdoor cooking areas, as they are able to withstand the elements and are easy to clean. Additionally, these materials can be used to create a variety of designs, such as a built-in grill or an outdoor kitchen.

Third, choose the equipment for the outdoor cooking area. The type of equipment needed will depend on the type of cooking that will be done. For example, a gas grill may be needed for grilling, while a smoker may be needed for slow-cooking. Additionally, other equipment such as a pizza oven, a rotisserie, or a smoker box may be needed for more complex cooking processes.

Finally, consider the layout of the outdoor cooking area. The layout should be designed to maximize efficiency and enjoyment. For example, the grill should be placed in a central location, with other equipment and supplies placed around it. Additionally, the layout should be designed to allow for easy access to all areas of the cooking area.

By following these steps, an outdoor cooking area can be designed for maximum efficiency and enjoyment. With careful consideration of the space, materials, and equipment, an outdoor cooking area can be a great addition to any home.

Tips for Creating the Perfect Outdoor Culinary Retreat: From Grills to Smokers and Everything In Between

1. Invest in Quality Grills and Smokers: When creating the perfect outdoor culinary retreat, it is important to invest in quality grills and smokers. Look for grills and smokers that are made from durable materials and have features that will make cooking easier and more enjoyable.

2. Choose the Right Fuel Source: When selecting a grill or smoker, it is important to consider the type of fuel source that will be used. Charcoal, gas, and electric are all popular options, and each has its own advantages and disadvantages. Consider the type of food that will be cooked, the size of the cooking area, and the convenience of the fuel source when making a decision.

3. Utilize Outdoor Kitchen Accessories: To make the outdoor culinary retreat complete, consider investing in outdoor kitchen accessories. This could include a side burner, a rotisserie, a smoker box, or a pizza oven. These accessories can help to make cooking easier and more enjoyable.

4. Create a Comfortable Seating Area: To make the outdoor culinary retreat complete, it is important to create a comfortable seating area. This could include a patio set, outdoor chairs, or even a hammock. This will provide a place for guests to relax and enjoy the food that has been cooked.

5. Incorporate Ambient Lighting: To create a relaxing atmosphere, consider incorporating ambient lighting into the outdoor culinary retreat. This could include string lights, tiki torches, or even candles. This will help to create a cozy atmosphere and make the outdoor culinary retreat more inviting.

6. Utilize Outdoor Cooking Utensils: To make cooking easier and more enjoyable, it is important to have the right outdoor cooking utensils. This could include a spatula, tongs, a basting brush, or a thermometer. Having the right tools will make cooking easier and more enjoyable.

7. Incorporate Greenery: To make the outdoor culinary retreat more inviting, consider incorporating greenery into the space. This could include potted plants, hanging plants, or even a garden. This will help to create a relaxing atmosphere and make the outdoor culinary retreat more inviting.

By following these tips, you can create the perfect outdoor culinary retreat. Invest in quality grills and smokers, choose the right fuel source, utilize outdoor kitchen accessories, create a comfortable seating area, incorporate ambient lighting, utilize outdoor cooking utensils, and incorporate greenery. With these tips, you can create the perfect outdoor culinary retreat.The Outdoor Culinary Retreat: Create Your Own Outdoor Cooking Area is a great way to create a unique outdoor cooking area that is both functional and aesthetically pleasing. With the right planning and design, you can create a space that is perfect for entertaining, cooking, and relaxing. Whether you are looking for a place to host a dinner party or just a place to relax and enjoy the outdoors, the Outdoor Culinary Retreat can help you create the perfect outdoor cooking area.

Elevate Your Space: Designing Multi-Level Decks for Outdoor Entertainment

Elevate Your Space: Designing Multi-Level Decks for Outdoor Entertainment is a comprehensive guide to creating the perfect outdoor living space. Whether you’re looking to build a multi-level deck for entertaining guests or just want to create a relaxing outdoor retreat, this book has all the information you need. It covers everything from design considerations to construction techniques, and provides detailed instructions for building a variety of multi-level decks. With Elevate Your Space, you’ll be able to create a beautiful and functional outdoor living space that will be the envy of your neighbors.

Maximizing Your Outdoor Space: Benefits of Installing a Multi-Level Deck

Outdoor living spaces are becoming increasingly popular as homeowners look for ways to maximize their outdoor space. One of the most effective ways to do this is to install a multi-level deck. A multi-level deck is a deck that is built on multiple levels, allowing for more usable space and a variety of design options. This type of deck can be used to create a variety of outdoor living spaces, from a cozy seating area to a large outdoor kitchen. In this article, we will discuss the benefits of installing a multi-level deck and how it can help you maximize your outdoor space.

One of the primary benefits of installing a multi-level deck is that it allows you to create multiple outdoor living spaces. By building the deck on multiple levels, you can create separate areas for different activities. For example, you can create a cozy seating area on one level and a large outdoor kitchen on another. This allows you to make the most of your outdoor space and create a variety of different outdoor living areas.

Another benefit of installing a multi-level deck is that it can help you maximize the use of your outdoor space. By building the deck on multiple levels, you can create more usable space than you would with a single-level deck. This allows you to create a larger outdoor living area and make the most of your outdoor space.

Finally, installing a multi-level deck can also help you create a unique and attractive outdoor living space. By building the deck on multiple levels, you can create a variety of different design options. This allows you to create a unique and attractive outdoor living space that is tailored to your specific needs and tastes.

In conclusion, installing a multi-level deck can be a great way to maximize your outdoor space. It allows you to create multiple outdoor living spaces, maximize the use of your outdoor space, and create a unique and attractive outdoor living space. If you are looking for ways to maximize your outdoor space, installing a multi-level deck is a great option.

Designing a Multi-Level Deck for Maximum Entertainment: Tips and Tricks

Designing a multi-level deck for maximum entertainment can be a daunting task. However, with the right tips and tricks, you can create a deck that is both aesthetically pleasing and highly functional. Here are some tips and tricks to help you design a multi-level deck that will be the envy of your neighborhood.

First, consider the size and shape of your deck. Multi-level decks are often larger than single-level decks, so you will need to plan accordingly. Consider the size of your yard and the amount of space you have available. You may also want to consider the shape of your deck, as this will affect the overall design.

Second, think about the purpose of your deck. Are you looking for a place to entertain guests or a place to relax and enjoy the outdoors? Knowing the purpose of your deck will help you determine the best design for your needs.

Third, consider the materials you will use for your deck. Wood is a popular choice for decks, but there are other materials available, such as composite and PVC. Each material has its own advantages and disadvantages, so be sure to research the pros and cons of each before making a decision.

Fourth, think about the features you want to include on your deck. Do you want a built-in bar or grill? Do you want a hot tub or fire pit? Knowing what features you want to include will help you plan the layout of your deck.

Finally, consider the safety of your deck. Make sure that all railings and stairs are up to code and that the deck is properly secured to the house. You should also consider adding lighting to your deck to ensure that it is safe to use at night.

By following these tips and tricks, you can design a multi-level deck that is both aesthetically pleasing and highly functional. With the right design, your deck can be the perfect place to entertain guests or relax and enjoy the outdoors.Elevate Your Space: Designing Multi-Level Decks for Outdoor Entertainment is an invaluable resource for anyone looking to create a multi-level deck for their outdoor entertainment space. It provides detailed instructions on how to design and build a multi-level deck, as well as helpful tips and tricks for making the most of the space. With its comprehensive approach, Elevate Your Space is sure to help anyone create a beautiful and functional outdoor entertainment area.

Patio Perfection: Planning the Ideal Patio Layout for Your Outdoor Living

Space

Welcome to Patio Perfection! Here, you will find all the information you need to plan the ideal patio layout for your outdoor living space. Whether you are looking to create a cozy outdoor retreat or a luxurious entertaining area, we have the tips and tricks to help you create the perfect patio. From choosing the right furniture and accessories to creating a functional and stylish layout, we will guide you through the entire process. So, let’s get started and create the perfect patio for your outdoor living space!

How to Design the Perfect Patio Layout for Your Outdoor Living Space

Designing the perfect patio layout for an outdoor living space requires careful consideration of the available space, the desired activities, and the desired aesthetic. To begin, it is important to measure the available space and determine the size and shape of the patio. This will help to determine the size and shape of the furniture and other elements that will be included in the design.

Next, consider the activities that will take place on the patio. This will help to determine the type of furniture and other elements that should be included in the design. For example, if the patio will be used for entertaining, then seating and tables should be included. If the patio will be used for relaxing, then comfortable seating and a fire pit may be included.

Finally, consider the desired aesthetic. This will help to determine the type of materials that should be used in the design. For example, if a modern look is desired, then materials such as concrete, metal, and glass may be used. If a more traditional look is desired, then materials such as brick, stone, and wood may be used.

Once the size, shape, activities, and aesthetic have been determined, the next step is to create a plan. This plan should include the placement of furniture and other elements, as well as the type of materials that will be used. It is also important to consider the lighting and other features that will be included in the design.

By following these steps, it is possible to create the perfect patio layout for an outdoor living space. With careful consideration of the available space, desired activities, and desired aesthetic, it is possible to create a patio that is both functional and aesthetically pleasing.

Tips for Maximizing Your Patio Layout to Create the Ideal Outdoor Living Area

1. Consider the Size of Your Patio: Before you begin designing your patio layout, it is important to consider the size of your patio. This will help you determine the type of furniture and accessories that will fit comfortably in the space. Additionally, it will help you plan the layout of the patio to ensure that it is both aesthetically pleasing and functional.

2. Utilize Multi-Functional Furniture: To maximize the space on your patio, consider utilizing multi-functional furniture. This could include pieces such as an ottoman that doubles as a storage unit or a coffee table that can be used as a dining table. This type of furniture will help you make the most of the space on your patio.

3. Incorporate Seating Areas: To create an inviting outdoor living area, it is important to incorporate seating areas. This could include a seating area around a fire pit, a dining area, or a lounge area. This will provide a comfortable space for you and your guests to relax and enjoy the outdoors.

4. Utilize Vertical Space: To maximize the space on your patio, consider utilizing vertical space. This could include hanging planters, wall-mounted shelves, or even a vertical garden. This will help you make the most of the space on your patio while also adding a touch of greenery.

5. Incorporate Lighting: To create a cozy atmosphere on your patio, consider incorporating lighting. This could include string lights, lanterns, or even candles. This will help to create a warm and inviting atmosphere on your patio.

6. Add Color and Texture: To create an inviting outdoor living area, it is important to add color and texture. This could include colorful outdoor rugs, pillows, and throws. This will help to create a cozy and inviting atmosphere on your patio.

By following these tips, you can maximize the space on your patio and create the ideal outdoor living area. With the right furniture, accessories, and lighting, you can create a cozy and inviting atmosphere on your patio.Space

Patio Perfection is an invaluable resource for anyone looking to create the perfect outdoor living space. With its comprehensive guide to patio layout, design, and materials, it provides all the information needed to create a beautiful and functional patio that will be enjoyed for years to come. Whether you are looking to create a cozy outdoor retreat or a grand entertaining space, Patio Perfection has the tools and advice to help you create the perfect patio for your needs.

Welcoming Retreat: How to Build a Front Porch That Wows Your Guests

Welcome to Welcoming Retreat: How to Build a Front Porch That Wows Your Guests! Whether you’re a homeowner looking to spruce up your front porch or a contractor looking to build a porch from scratch, this guide will provide you with the information you need to create a welcoming and inviting outdoor space. We’ll cover everything from design ideas to materials and construction techniques, so you can create a porch that will be the envy of your neighborhood. With the right design and materials, you can create a porch that will be the perfect place to relax and entertain your guests. So let’s get started and create a porch that will wow your guests!

5 Tips for Creating a Welcoming Front Porch Retreat

1. Invest in Comfortable Seating: Investing in comfortable seating is essential for creating a welcoming front porch retreat. Choose seating that is both comfortable and stylish, such as a porch swing, rocking chairs, or a loveseat. Make sure the seating is large enough to accommodate multiple people.

2. Add Greenery: Adding greenery to your front porch is a great way to create a cozy and inviting atmosphere. Consider adding potted plants, hanging baskets, or window boxes to your porch. This will help to create a natural and inviting atmosphere.

3. Install Lighting: Installing lighting on your front porch is a great way to create a warm and inviting atmosphere. Consider installing string lights, lanterns, or solar lights to your porch. This will help to create a cozy and inviting atmosphere.

4. Add Color: Adding color to your front porch is a great way to create a welcoming atmosphere. Consider adding colorful pillows, rugs, or outdoor furniture to your porch. This will help to create a vibrant and inviting atmosphere.

5. Add Accessories: Adding accessories to your front porch is a great way to create a unique and inviting atmosphere. Consider adding a welcome mat, a wind chime, or a bird feeder to your porch. This will help to create a unique and inviting atmosphere.

How to Design a Front Porch That Invites Guests to Relax and Enjoy the Outdoors

Designing a front porch that invites guests to relax and enjoy the outdoors requires careful consideration of the space and its purpose. The porch should be designed to provide a comfortable and inviting atmosphere that encourages guests to linger and enjoy the outdoors.

When designing a porch, it is important to consider the size and shape of the space. A larger porch can accommodate more seating and provide more space for guests to move around. The shape of the porch should be taken into account as well, as this will affect the flow of the space and the overall aesthetic.

The furniture chosen for the porch should be comfortable and inviting. Seating should be arranged in a way that encourages conversation and relaxation. Consider adding a few pieces of outdoor furniture such as a bench, chairs, or a swing. If the porch is large enough, a table and chairs can be added for outdoor dining.

Lighting is an important element of porch design. Consider adding string lights, lanterns, or solar lights to create a warm and inviting atmosphere. If the porch is covered, consider adding ceiling fans to keep the air circulating.

Finally, consider adding plants and other decorative elements to the porch. Plants can add color and texture to the space, while decorative elements such as wind chimes or bird feeders can add a touch of whimsy.

By carefully considering the size, shape, furniture, lighting, and decorative elements of the porch, it is possible to create a space that invites guests to relax and enjoy the outdoors. With thoughtful design, a porch can become a welcoming and inviting outdoor space.The front porch of your home is the first impression your guests will have of your home, so it’s important to make sure it looks inviting and welcoming. With a few simple steps, you can create a front porch that will wow your guests and make them feel welcome. Start by choosing a style that fits your home and then add some furniture, plants, and decorations to make it look inviting. Finally, make sure to keep it clean and tidy to ensure that your guests have a pleasant experience. With a little bit of effort, you can create a front porch that will make your guests feel welcome and make your home look great.

Sail into Shade: Backyard Shade Sails for Cool and Comfortable Outdoor Spaces

Welcome to Sail into Shade! We are your go-to source for backyard shade sails that will help you create a cool and comfortable outdoor space. Our shade sails are designed to provide maximum sun protection while still allowing air to flow freely. We offer a variety of sizes, shapes, and colors to fit any outdoor space. Our sails are made from high-quality materials that are designed to last for years. With our help, you can create a beautiful and functional outdoor space that you and your family can enjoy for years to come.

How to Choose the Right Backyard Shade Sail for Your Outdoor Space

When it comes to creating a comfortable outdoor space, shade sails are an excellent option. Not only do they provide protection from the sun’s harmful UV rays, but they also add a stylish touch to any backyard. However, choosing the right shade sail for your outdoor space can be a daunting task. Here are some tips to help you make the right decision.

First, consider the size of your outdoor space. Shade sails come in a variety of sizes, so it’s important to measure the area you want to cover before making a purchase. This will help you determine the size of the sail you need.

Next, think about the shape of your outdoor space. Shade sails come in a variety of shapes, including square, rectangular, and triangular. Choose a shape that best fits the area you want to cover.

Finally, consider the material of the shade sail. Shade sails are typically made from polyester or canvas. Polyester is lightweight and durable, while canvas is heavier and more durable. Choose a material that best suits your needs.

By following these tips, you can easily choose the right backyard shade sail for your outdoor space. With the right sail, you can create a comfortable and stylish outdoor area that you and your family can enjoy for years to come.

The Benefits of Installing a Backyard Shade Sail for Your Home

Backyard shade sails are an increasingly popular way to provide shade and protection from the sun for outdoor living spaces. Shade sails are an attractive and cost-effective alternative to traditional patio covers, and they offer a number of benefits for homeowners.

The most obvious benefit of installing a backyard shade sail is the protection it provides from the sun’s harmful UV rays. Shade sails are designed to block up to 95% of the sun’s UV rays, making them an ideal choice for outdoor areas where people spend a lot of time. This protection can help reduce the risk of skin cancer and other sun-related health issues.

In addition to providing protection from the sun, shade sails also offer a number of aesthetic benefits. Shade sails come in a variety of colors and styles, allowing homeowners to customize their outdoor space to match their personal style. They can also be used to create interesting shapes and patterns in the backyard, adding visual interest to the area.

Shade sails are also a cost-effective option for providing shade. They are typically much less expensive than traditional patio covers, and they can be installed quickly and easily. This makes them a great choice for homeowners who want to add shade to their outdoor space without breaking the bank.

Finally, shade sails are a great way to add privacy to an outdoor space. The fabric of the sail blocks out the view from the outside, making it a great choice for homeowners who want to create a private oasis in their backyard.

Overall, installing a backyard shade sail is a great way to add shade, protection, and privacy to an outdoor space. The cost-effectiveness, ease of installation, and aesthetic benefits make them an attractive option for homeowners looking to upgrade their outdoor living space.Sail into Shade: Backyard Shade Sails for Cool and Comfortable Outdoor Spaces is an excellent resource for anyone looking to create a cool and comfortable outdoor space. With its comprehensive guide to shade sails, helpful tips, and detailed instructions, this book is sure to help you create the perfect backyard oasis. Whether you’re looking for a simple solution or a more complex design, Sail into Shade has the information you need to make your outdoor space a comfortable and inviting place to relax and enjoy the outdoors.

Backyard Bonfire Bliss: Creating the Perfect Atmosphere with a Backyard Fire Pit

Backyard Bonfire Bliss is a guide to creating the perfect atmosphere with a backyard fire pit. Whether you’re looking to host a cozy gathering of friends or a romantic evening for two, a backyard fire pit can be the perfect addition to your outdoor space. With the right setup, you can create a warm and inviting atmosphere that will make your guests feel right at home. This guide will provide you with all the information you need to create the perfect backyard bonfire, from choosing the right fire pit to selecting the right accessories. With a little bit of planning and preparation, you can create a backyard oasis that will be the envy of your friends and family.

How to Choose the Right Fire Pit for Your Backyard: Tips for Selecting the Perfect Fire Pit for Your Outdoor Space

When selecting the perfect fire pit for your outdoor space, there are several factors to consider. First, you should consider the size of the fire pit. The size of the fire pit should be proportional to the size of your outdoor space. If you have a large backyard, you may want to opt for a larger fire pit. On the other hand, if you have a smaller outdoor space, a smaller fire pit may be more appropriate.

Second, you should consider the type of fuel you plan to use. Fire pits can be powered by wood, gas, or charcoal. Each type of fuel has its own advantages and disadvantages. For example, wood-burning fire pits are more traditional and provide a cozy atmosphere, but they require more maintenance and can be more difficult to light. Gas fire pits are easier to light and require less maintenance, but they can be more expensive. Charcoal fire pits are the least expensive option, but they can be more difficult to control and require more frequent cleaning.

Third, you should consider the design of the fire pit. Fire pits come in a variety of shapes and sizes, and the design should complement the overall aesthetic of your outdoor space. For example, a modern fire pit may look out of place in a rustic backyard. Additionally, you should consider the materials used to construct the fire pit. Fire pits can be made from a variety of materials, such as stone, metal, or ceramic. Each material has its own advantages and disadvantages, so it is important to select the material that best suits your needs.

Finally, you should consider the safety features of the fire pit. Fire pits should be equipped with a spark screen or other safety features to prevent sparks from flying out of the fire pit and potentially causing a fire. Additionally, you should ensure that the fire pit is placed on a level surface and away from any flammable materials.

By considering these factors, you can select the perfect fire pit for your outdoor space. With the right fire pit, you can enjoy cozy evenings with friends and family in the comfort of your own backyard.

DIY Backyard Bonfire Bliss: Simple Steps for Creating the Perfect Outdoor Fire Pit Experience

Creating the perfect outdoor fire pit experience can be a great way to enjoy the outdoors with friends and family. Whether you’re looking to roast marshmallows, tell stories, or just relax and enjoy the night sky, a backyard bonfire can be a great way to do it. Here are some simple steps for creating the perfect outdoor fire pit experience.

1. Choose the Right Location: When selecting a location for your fire pit, it’s important to consider safety first. Choose a spot that is away from any structures, trees, or other flammable materials. Make sure the area is clear of any debris or combustible materials.

2. Prepare the Fire Pit: Once you’ve chosen the right location, it’s time to prepare the fire pit. If you’re using a pre-made fire pit, make sure it is in good condition and that all of the parts are in working order. If you’re building your own fire pit, make sure to use fire-resistant materials such as brick, stone, or concrete.

3. Gather Your Supplies: Before you start your fire, make sure you have all of the necessary supplies. This includes firewood, kindling, matches or a lighter, and a fire extinguisher.

4. Start the Fire: Once you have all of your supplies, it’s time to start the fire. Begin by placing the kindling in the center of the fire pit. Then, add the firewood in a teepee formation around the kindling. Light the kindling with a match or lighter and allow the fire to grow.

5. Enjoy the Fire: Once the fire is burning, it’s time to enjoy it. Roast marshmallows, tell stories, or just relax and enjoy the night sky. Make sure to keep an eye on the fire and keep it under control.

Creating the perfect outdoor fire pit experience doesn’t have to be complicated. With a little preparation and the right supplies, you can create a safe and enjoyable experience for you and your guests.Backyard Bonfire Bliss is a great way to create a cozy and inviting atmosphere in your backyard. With the right fire pit, you can create a warm and inviting atmosphere that will be perfect for entertaining friends and family. Whether you choose a wood-burning fire pit or a gas-powered one, you can create a beautiful and inviting atmosphere that will be sure to make your backyard the perfect place to relax and enjoy the evening.

Inspiration Galore: Explore Stunning Pictures of Patios for Your Outdoor Paradise

Welcome to Inspiration Galore! If you’re looking for stunning pictures of patios to help you create your own outdoor paradise, you’ve come to the right place. Here, you’ll find a wide variety of patio designs to inspire you, from cozy and intimate to grand and luxurious. Whether you’re looking for a place to relax and entertain guests or a spot to enjoy a morning cup of coffee, you’ll find plenty of ideas to get you started. So, take a look around and let your imagination run wild!

How to Create an Outdoor Oasis with Inspiring Pictures of Patios

Creating an outdoor oasis can be a great way to enjoy the outdoors and relax in your own backyard. With the right design and furnishings, you can create a beautiful and inviting space that will be the envy of your neighbors. To help you get started, here are some inspiring pictures of patios that can provide you with ideas for your own outdoor oasis.

When designing your outdoor oasis, consider the size and shape of your patio. If you have a large patio, you can create a luxurious space with plenty of seating and a large dining area. If you have a smaller patio, you can still create a cozy and inviting atmosphere with comfortable seating and a few accent pieces.

When selecting furniture for your outdoor oasis, choose pieces that are comfortable and durable. Look for pieces that are made from weather-resistant materials such as wicker, teak, or aluminum. You can also add a few accent pieces such as a fire pit or a fountain to create a more inviting atmosphere.

When it comes to lighting, you can choose from a variety of options. String lights, lanterns, and solar-powered lights are all great options for creating a warm and inviting atmosphere. You can also add a few candles or tiki torches to create a more romantic atmosphere.

Finally, don’t forget to add some greenery to your outdoor oasis. Plants and flowers can add color and texture to your patio and create a more inviting atmosphere. You can also add a few potted plants to create a more natural look.

By following these tips and looking at inspiring pictures of patios, you can create an outdoor oasis that is both beautiful and inviting. With the right design and furnishings, you can create a space that you and your family will enjoy for years to come.

Get Inspired to Transform Your Patio with Stunning Pictures of Patios from Around the World

Patios are a great way to transform outdoor spaces into inviting and comfortable areas for relaxation and entertainment. From cozy and intimate patios to grand and luxurious outdoor spaces, there are countless ways to create a unique and beautiful patio. To help inspire your own patio transformation, here are some stunning pictures of patios from around the world.

The first patio is located in the heart of the Italian countryside. This patio features a large stone terrace with a built-in fireplace and seating area. The terrace is surrounded by lush green gardens and a stunning view of the rolling hills and vineyards. This patio is perfect for entertaining guests or simply enjoying a peaceful evening outdoors.

The second patio is located in the heart of the French Riviera. This patio features a large pool surrounded by a terrace with comfortable seating and a built-in bar. The terrace is surrounded by lush gardens and a stunning view of the Mediterranean Sea. This patio is perfect for hosting parties or simply enjoying a relaxing day in the sun.

The third patio is located in the heart of the Caribbean. This patio features a large pool surrounded by a terrace with comfortable seating and a built-in bar. The terrace is surrounded by lush gardens and a stunning view of the Caribbean Sea. This patio is perfect for hosting parties or simply enjoying a relaxing day in the sun.

These stunning pictures of patios from around the world are sure to inspire you to create your own unique and beautiful patio. Whether you’re looking for a cozy and intimate patio or a grand and luxurious outdoor space, there are countless ways to transform your outdoor space into an inviting and comfortable area for relaxation and entertainment.Inspiration Galore: Explore Stunning Pictures of Patios for Your Outdoor Paradise is a great resource for anyone looking to create their own outdoor paradise. With a wide variety of patio designs to choose from, you can find the perfect style to fit your home and lifestyle. Whether you’re looking for a cozy and intimate space or a grand and luxurious outdoor area, Inspiration Galore has something for everyone. With the help of this resource, you can create the perfect outdoor paradise that you and your family can enjoy for years to come.

Step-by-Step Serenity: How to Lay a Flagstone Path in Your Garden

Step-by-Step Serenity: How to Lay a Flagstone Path in Your Garden is a comprehensive guide to creating a beautiful and tranquil flagstone path in your garden. This guide will provide you with all the information you need to create a stunning and unique path that will add a touch of serenity to your outdoor space. From selecting the right materials to laying the stones, this guide will walk you through the entire process step-by-step. With this guide, you can create a beautiful and peaceful path that will be the envy of your neighbors.

Step-by-Step Guide to Creating a Flagstone Path in Your Garden

Creating a flagstone path in your garden can be a great way to add a unique and attractive feature to your outdoor space. This step-by-step guide will help you create a beautiful and durable flagstone path that will last for years to come.

Step 1: Plan Your Path

Before you begin, it is important to plan out your path. Consider the size and shape of the path, as well as the materials you will need. Make sure to measure the area where you plan to install the path and draw a diagram of the path on paper.

Step 2: Prepare the Area

Once you have planned out your path, it is time to prepare the area. Start by removing any existing vegetation and debris from the area. Then, use a shovel to dig a trench that is about 4 inches deep and wide enough to accommodate the flagstones.

Step 3: Install the Edging

Once the area is prepared, it is time to install the edging. Edging will help keep the flagstones in place and give the path a finished look. You can use a variety of materials for edging, such as bricks, stones, or metal.

Step 4: Lay the Flagstones

Now it is time to lay the flagstones. Start by laying the first flagstone in the center of the path. Then, work your way outwards, making sure to leave a gap of about 1/4 inch between each flagstone.

Step 5: Fill in the Gaps

Once all of the flagstones are in place, it is time to fill in the gaps. Use a mixture of sand and gravel to fill in the gaps between the flagstones. Make sure to tamp down the mixture to ensure that it is firmly in place.

Step 6: Finish the Path

Finally, it is time to finish the path. Use a broom to sweep away any excess sand and gravel. Then, use a garden hose to wash away any dirt or debris that may have accumulated on the flagstones.

Creating a flagstone path in your garden can be a great way to add a unique and attractive feature to your outdoor space. By following these steps, you can create a beautiful and durable flagstone path that will last for years to come.

Tips for Installing a Flagstone Path in Your Garden for Maximum Serenity

1. Choose the Right Flagstone: When selecting flagstone for your garden path, consider the size, shape, and color of the stones. Choose stones that are large enough to provide a stable surface, but small enough to fit the desired pattern. Additionally, select stones with a variety of colors and textures to create a visually appealing path.

2. Prepare the Ground: Before laying the flagstone, it is important to prepare the ground. Remove any existing vegetation and level the surface. If necessary, add a layer of gravel or sand to create a stable base.

3. Lay the Flagstone: Begin laying the flagstone at one end of the path and work your way to the other end. Place the stones in a pattern that is aesthetically pleasing and allows for easy walking. Make sure to leave enough space between the stones for grass or other plants to grow.

4. Secure the Flagstone: Once the flagstone is in place, secure it with mortar or sand. This will help keep the stones in place and prevent them from shifting over time.

5. Add Finishing Touches: To complete the path, add edging stones along the sides and fill in any gaps with gravel or sand. Plant flowers or other plants along the sides of the path to add color and texture.

By following these steps, you can create a beautiful and serene flagstone path in your garden. With the right materials and a bit of patience, you can create a peaceful and inviting outdoor space.In conclusion, laying a flagstone path in your garden is a great way to add beauty and value to your outdoor space. With the right materials, tools, and a bit of patience, you can create a stunning and durable pathway that will last for years to come. With the step-by-step instructions provided in this guide, you can easily create a beautiful flagstone path in your garden that will be the envy of your neighbors.